Introduction #
Solax inverters can be connected to the Qilowatt system via Modbus communication. This guide explains the required preparations, RS485 wiring, inverter settings, operating modes, and the importance of firmware updates.
Prerequisites #
• Inverter and battery firmware are up to date
• A Modbus module is available
• Required tools and a communication cable (CAT5 or CAT6)
• A Qilowatt account has been created and the app is ready for adding devices → Creating a user account
• A Modbus module is available
• Required tools and a communication cable (CAT5 or CAT6)
• A Qilowatt account has been created and the app is ready for adding devices → Creating a user account
Step-by-step Guide #
1. Preparation #
• Update the inverter and battery firmware before connecting.
• Ensure you are using the latest manufacturer version, since Qilowatt always relies on the newest Modbus protocol.
• Ensure you are using the latest manufacturer version, since Qilowatt always relies on the newest Modbus protocol.
2. RS485 connections #
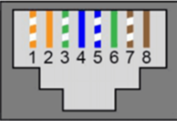
Solax X1/X3 inverter COM port:
• Pin 4 → RS485 A
• Pin 5 → RS485 B
Use Pin 4 (A) and Pin 5 (B) to connect the Qilowatt device.
• Pin 4 → RS485 A
• Pin 5 → RS485 B
Use Pin 4 (A) and Pin 5 (B) to connect the Qilowatt device.
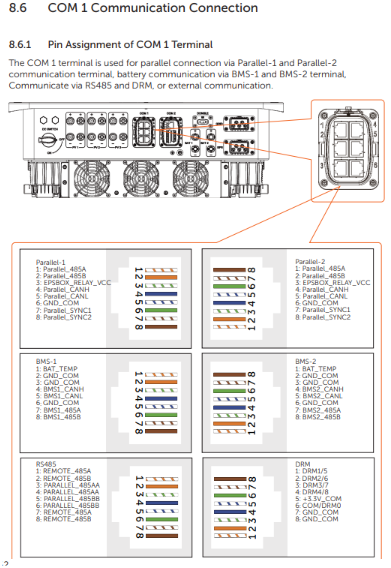
Solax Ultra inverter RS485 port:
• Pin 1 → RS485 A
• Pin 2 → RS485 B
Pin numbers may vary by model – always check the specific device manual.
• Pin 1 → RS485 A
• Pin 2 → RS485 B
Pin numbers may vary by model – always check the specific device manual.
3. Inverter settings #
• Unlock password: 2014
Solax is the only manufacturer that requires an Unlock Password for Modbus control. If the password is changed, Qilowatt will no longer be able to control the inverter.
• Modbus address: 1 (default)
• Baud rate: 9600
The inverter default Baud rate is 19200. For communication with Qilowatt, this must be changed to 9600. If needed, the Qilowatt support team can adjust this in the Qilowatt device as well.
Modbus address and Baud rate settings can also be modified via the Solax SolarCloud app.
4. Operating modes #
• Mandatory step: enable battery usage
Discharge period: 00:00–23:59
Charge period: 00:00–00:00
• Installer password: 2014
Test whether you can access Remote control in Solax Cloud with this password.
• Disable all remote controls, AI features, and time-of-use schedules to avoid conflicts.
• Operation takes place in Back-Up mode.
! In Self-use mode, the inverter will not accept commands if the battery is empty.
• The Solax Datahub must be removed – even if not actively controlling, it interferes with communication.
5. Why is a firmware update necessary? #
Qilowatt always uses the manufacturer’s latest Modbus protocol. If the inverter or battery firmware is not updated, control may not work correctly.
Result #
The Solax inverter is successfully configured and connected to the Qilowatt system. The module transmits data and enables device control and energy optimization.
If it Doesn’t Work #
• If RS485 communication does not work, check that you used the correct pins according to the model.
• If communication still fails, verify the Modbus address and Baud rate values.
• If control is not functioning, make sure the Unlock Password is still set to 2014.
• If the issue persists, contact our team: support@qilowatt.eu.
• If communication still fails, verify the Modbus address and Baud rate values.
• If control is not functioning, make sure the Unlock Password is still set to 2014.
• If the issue persists, contact our team: support@qilowatt.eu.


