Introduction #
Qilowatt supports smart thermostats that help automate heating control. To install a thermostat, it must be connected to the power supply, configured on its display, and linked with the Qilowatt app.
Prerequisites #
• Power supply must be turned off during installation
• Old thermostat is ready for removal
• New Qilowatt-compatible thermostat and temperature sensor are available
• Required tools (screwdriver, etc.)
• Optional: a Qilowatt account is created and the app is ready for linking → Creating a user account
• Old thermostat is ready for removal
• New Qilowatt-compatible thermostat and temperature sensor are available
• Required tools (screwdriver, etc.)
• Optional: a Qilowatt account is created and the app is ready for linking → Creating a user account
Step-by-step Guide #
Installation #
1. The package includes the control unit and a waterproof temperature sensor. Suitable for a standard junction box with at least 25 mm depth (see dimension diagram).
2. Remove the thermostat screen from the frame: hold the screen and push the frame part about 5 mm downwards. Disconnect the cable connecting the two parts.
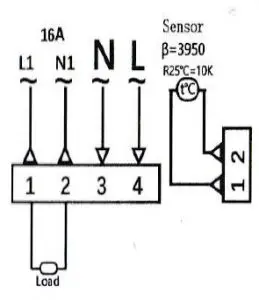
3. Connect the wires according to the scheme:
• 1 – heating element phase*
• 2 – heating element neutral*
• 3 – mains neutral
• 4 – mains phase
(* polarity is usually not important)
4. Pay attention to:
• Stranded wire ends must be crimped or soldered.
• For loads over 2000 W, the wire cross-section must be at least 2.5 mm².
• The heating device must be grounded.
5. Maximum allowed load: 16 A (approx. 3500 W at 230 V).
6. Install the thermostat into the junction box, connect the screen cable, and press the screen back into place.
2. Remove the thermostat screen from the frame: hold the screen and push the frame part about 5 mm downwards. Disconnect the cable connecting the two parts.
3. Connect the wires according to the scheme:
• 1 – heating element phase*
• 2 – heating element neutral*
• 3 – mains neutral
• 4 – mains phase
(* polarity is usually not important)
4. Pay attention to:
• Stranded wire ends must be crimped or soldered.
• For loads over 2000 W, the wire cross-section must be at least 2.5 mm².
• The heating device must be grounded.
5. Maximum allowed load: 16 A (approx. 3500 W at 230 V).
6. Install the thermostat into the junction box, connect the screen cable, and press the screen back into place.
Display indicators and basic settings #
• Time, weekday, and current temperature are shown at the top.
• Period, target temperature, operating mode, child lock – indicated by icons on the display.
• The heating element indicator shows when the element is powered.
Setting the time:
1. Tap the clock icon → hours start blinking → adjust with arrow buttons.
2. Tap again → set minutes.
3. Tap a third time → select weekday.
4. Tap a fourth time → save the setting.
Operating modes #
• Manual mode (hand icon) – press M until the hand icon appears, then set the desired temperature with arrow keys.
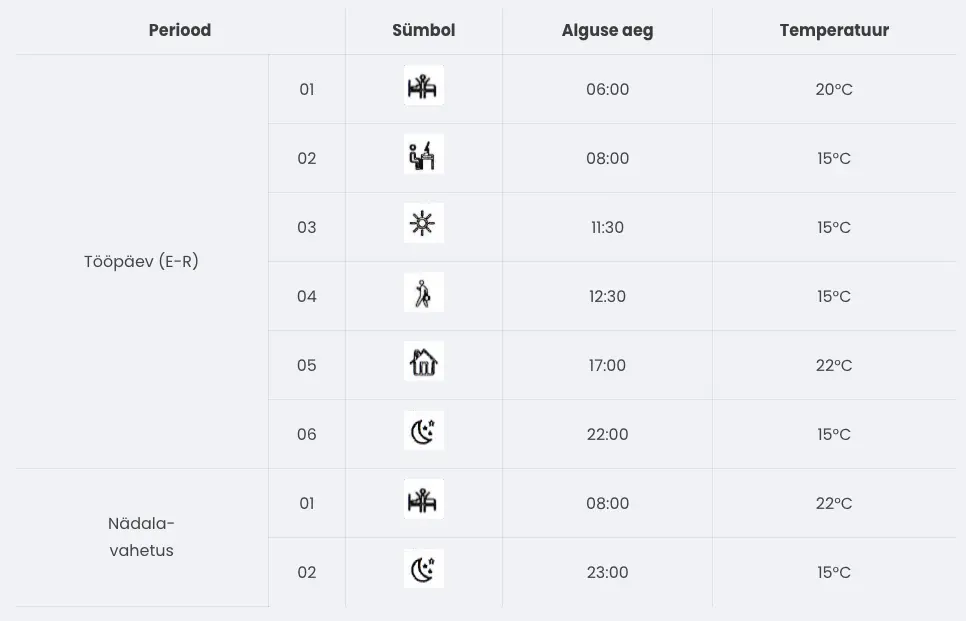
• Automatic mode (clock icon) – activates according to preset schedules.
To change presets: turn the device off, hold M and the clock button for 5 seconds.
Adjust values with arrows, move to next field with M.
• Automatic mode (clock icon) – activates according to preset schedules.
To change presets: turn the device off, hold M and the clock button for 5 seconds.
Adjust values with arrows, move to next field with M.
Protection functions #
• Anti-freeze protection: turns heating on below 5 °C and off above 7 °C.
• Overheat protection: activates by default at 60 °C.
• Overheat protection: activates by default at 60 °C.
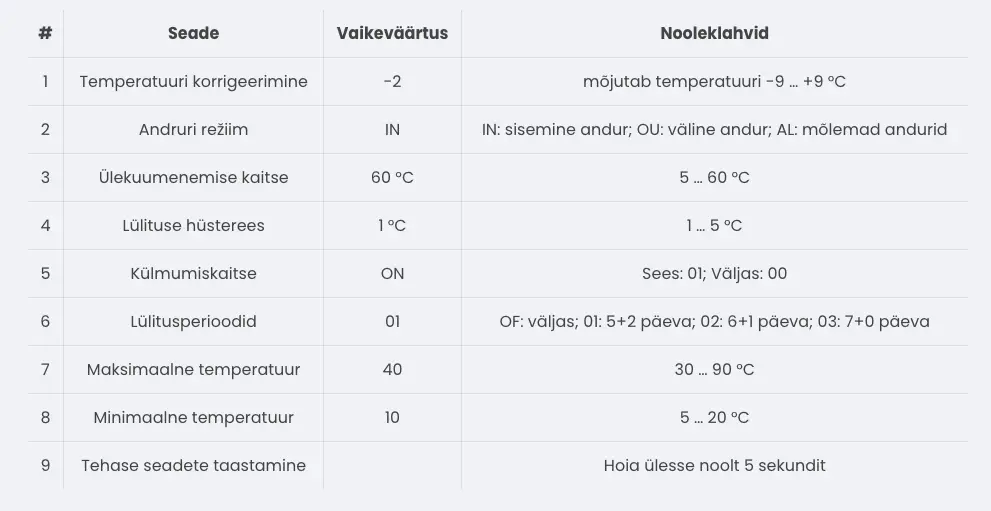
Advanced settings #
• Turn the device off, then hold M and the down arrow simultaneously.
• Allows adjusting device parameters and running initial setup.
• Exit the menu with the power-off button.
• Allows adjusting device parameters and running initial setup.
• Exit the menu with the power-off button.
Linking the thermostat with the Qilowatt app #
• Open the Qilowatt app.
• Add the device following the guide → Connecting the device to WiFi.
• Once linked, the thermostat can be controlled remotely according to schedules and temperatures set in the app.
• Add the device following the guide → Connecting the device to WiFi.
• Once linked, the thermostat can be controlled remotely according to schedules and temperatures set in the app.
Result #
The thermostat is installed and configured. It can operate in both manual and automatic modes and can be linked with the Qilowatt app for remote control.
If it Doesn’t Work #
• Check that the wires are connected correctly and grounding is in place.
• If the screen does not light up, make sure the power supply is on.
• If the Qilowatt app does not detect the device, follow the guide → Connecting the device to WiFi.
• If the issue persists, contact our team: support@qilowatt.eu.
• If the screen does not light up, make sure the power supply is on.
• If the Qilowatt app does not detect the device, follow the guide → Connecting the device to WiFi.
• If the issue persists, contact our team: support@qilowatt.eu.


