Introduction #
GoodWe ET and ET Plus hybrid inverters can be connected to the Qilowatt system via Modbus communication. This guide explains the necessary preparations, RS485 wiring, inverter settings, and operating modes.
Prerequisites #
• Inverter and battery firmware are updated (latest version must be used)
• A Modbus module is available
• Required tools and a communication cable (CAT5 or CAT6)
• A Qilowatt account has been created and the app is ready for adding devices → Creating a user account
• A Modbus module is available
• Required tools and a communication cable (CAT5 or CAT6)
• A Qilowatt account has been created and the app is ready for adding devices → Creating a user account
Step-by-step Guide #
1. Preparation #
• Update the inverter and battery firmware before connecting.
• Ensure the device has the latest firmware, since Qilowatt always relies on the newest Modbus protocol.
• Ensure the device has the latest firmware, since Qilowatt always relies on the newest Modbus protocol.
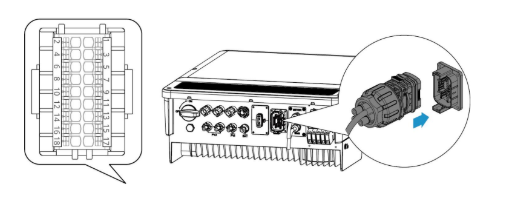
2. RS485 connections #
GoodWe ET 5–10 kW hybrid inverter (COM port):
• Pin 1 → RS485 A1
• Pin 2 → RS485 B1
Use Pin 1 (A) and Pin 2 (B) to connect the Qilowatt device.
Note: Before installation, make sure the device has a Data port.
• Pin 1 → RS485 A1
• Pin 2 → RS485 B1
Use Pin 1 (A) and Pin 2 (B) to connect the Qilowatt device.
Note: Before installation, make sure the device has a Data port.
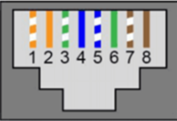
GoodWe ET 15–30 kW hybrid inverter (EMS port):
• Pin 1 → RS485 A
• Pin 2 → RS485 B
• Pin 4 → GND
• Pin 5 → CAN_L
• Pin 6 → CAN_H
Use Pin 1 (A) and Pin 2 (B) to connect the Qilowatt device.
• Pin 1 → RS485 A
• Pin 2 → RS485 B
• Pin 4 → GND
• Pin 5 → CAN_L
• Pin 6 → CAN_H
Use Pin 1 (A) and Pin 2 (B) to connect the Qilowatt device.
3. Inverter settings #
• Modbus address: 247 (default)
• Baud rate: 9600 (default)
If needed, the Modbus address can be changed via the GoodWe SEMS or Solar-Go apps.
• Baud rate: 9600 (default)
If needed, the Modbus address can be changed via the GoodWe SEMS or Solar-Go apps.
4. Operating modes #
• Set the inverter to Self-use mode (in older systems called General).
• Disable all modes that prevent external control:
TOU (time-of-use)
ECO
Peak Shaving
All remote controls
• Disable all modes that prevent external control:
TOU (time-of-use)
ECO
Peak Shaving
All remote controls
5. Why is a firmware update necessary? #
Qilowatt always uses the manufacturer’s latest Modbus protocol. If the inverter or battery firmware is not updated, control may not work correctly.
Result #
The GoodWe ET / ET Plus inverter is successfully configured and connected to the Qilowatt system. The module transmits data and enables inverter control and energy optimization.
If it Doesn’t Work #
• If communication does not work, check the RS485 connections and confirm that the port is available.
• If control does not function, make sure the inverter is in Self-use mode and that all other modes (TOU, ECO, Peak Shaving) are disabled.
• If the Modbus address is incorrect, change it using the SEMS or Solar-Go app.
• If the issue persists, contact our team: support@qilowatt.eu.
• If control does not function, make sure the inverter is in Self-use mode and that all other modes (TOU, ECO, Peak Shaving) are disabled.
• If the Modbus address is incorrect, change it using the SEMS or Solar-Go app.
• If the issue persists, contact our team: support@qilowatt.eu.


