Introduction #
If your home router has been replaced or the WiFi network name has changed, you don’t need to reset your Qilowatt device.
You can simply add the new WiFi network credentials directly in the device settings, so it can automatically reconnect to the updated network.
You can simply add the new WiFi network credentials directly in the device settings, so it can automatically reconnect to the updated network.
Step-by-step Guide #
1. Open WiFi settings in the Qilowatt app #
1. Open the Qilowatt app.
2. From the left-hand menu, go to My Devices and select the device you wish to update.
3. Scroll to Device Info and click Edit.
2. From the left-hand menu, go to My Devices and select the device you wish to update.
3. Scroll to Device Info and click Edit.

2. Add a new WiFi network #
1. The WiFi configuration view will open.
• The field SSID 1 shows the currently active network name.
• The password field is not displayed.
• The field SSID 1 shows the currently active network name.
• The password field is not displayed.
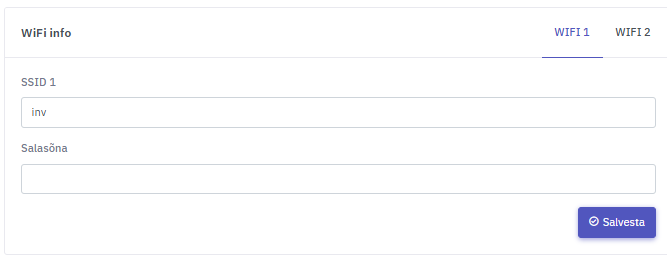
2. To add a new or backup network, click WiFi 2.
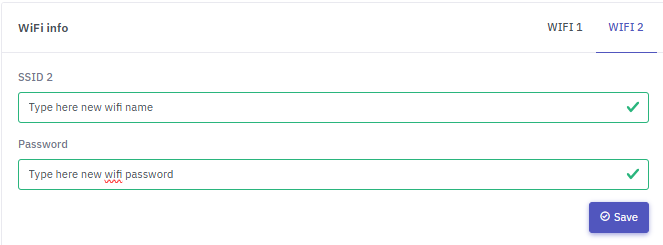
3. Enter the following:
• SSID 2 – the new WiFi network name
• Parool – the password for the new WiFi network
4. Click Save.
Now the device is configured to connect automatically to the new (or alternative) WiFi network.
3. Enter the following:
• SSID 2 – the new WiFi network name
• Parool – the password for the new WiFi network
4. Click Save.
Now the device is configured to connect automatically to the new (or alternative) WiFi network.
⚠️ Make sure that the network name and password are entered exactly as they appear — pay attention to uppercase/lowercase letters and symbols.
Any mismatch will prevent the device from switching to the new network.
2. Using the default Recovery network #
All new Qilowatt devices have a predefined alternative network (SSID 2) called Recovery.
This allows the device to connect automatically if the main WiFi network is unavailable.
Default Recovery network details:
• SSID 2: Recovery
• Password: a1b2c3d4
This allows the device to connect automatically if the main WiFi network is unavailable.
Default Recovery network details:
• SSID 2: Recovery
• Password: a1b2c3d4
If you enable a mobile or computer Hotspot using the same network name and password, the Qilowatt device will automatically connect to it when the main network is offline.
Result #
The Qilowatt device has successfully connected to the new or alternative WiFi network.
The system will continue operating without the need to reset or reconfigure the device.
The system will continue operating without the need to reset or reconfigure the device.
If it Doesn’t Work #
• Make sure the WiFi network uses 2.4 GHz frequency.
• Double-check that the network name and password are correct.
• Try restarting the Qilowatt device.
• If the issue persists, contact: support@qilowatt.eu
• Double-check that the network name and password are correct.
• Try restarting the Qilowatt device.
• If the issue persists, contact: support@qilowatt.eu


