Introduction #
In the Qilowatt app, you need to configure the solar inverter data so the system can forecast production, manage batteries, and control electricity buying/selling. The steps below explain how to correctly set up the inverter info and solar panel groups.
Prerequisites #
• A Qilowatt account has been created → Creating a user account
• Device is connected to WiFi → Connecting the device to WiFi
• Inverter has been added to the Qilowatt app → Module setup
• Device is connected to WiFi → Connecting the device to WiFi
• Inverter has been added to the Qilowatt app → Module setup
Step-by-step Guide #
1. Configuring solar inverter info #
1. From the left menu, open Inverters and click the relevant inverter.
2. On the inverter page, click Plant info.
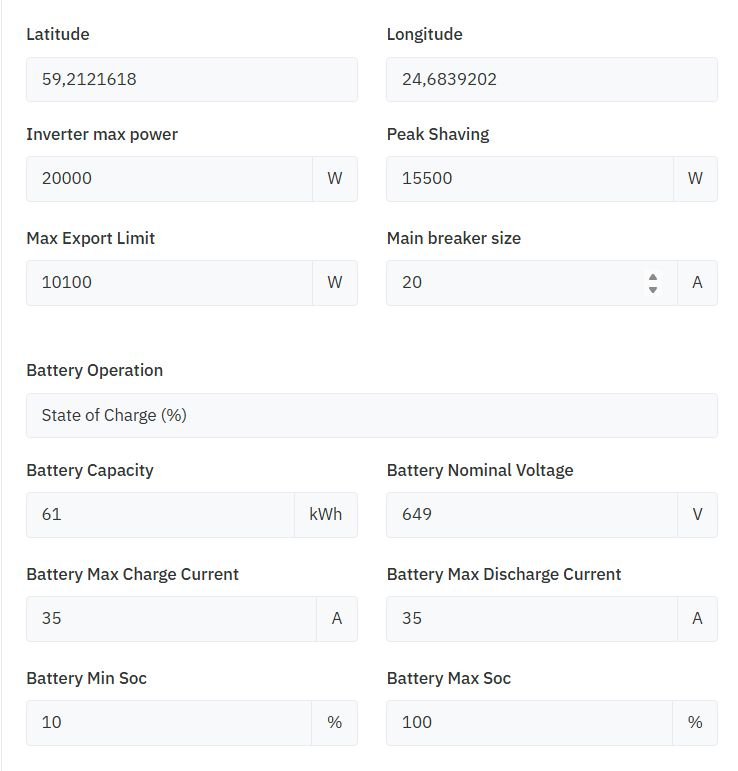
3. Fill in the fields according to your inverter data (use a dot as the decimal separator):
Latitude / Longitude – inverter location (required for production forecasting)
Inverter max power – device maximum operating power
Main breaker size – according to the electrical connection board
Battery Max Charge Current – in amps, when charging from the grid or solar
Battery max discharge current – in amps, when exporting to the grid
Battery Operation – choose State of Charge (%) or Voltage
Battery nominal voltage – in volts
Battery capacity – in kWh
Peak Shaving – limits peak consumption
Max export power – according to your grid operator agreement (e.g., nanogenerator 790 W; if no agreement → 0)
Refine forecast – enable if you want continuously improved solar forecast
4. Click Save.
! After saving, the device will reboot. The solar forecast may take up to 24 hours to appear. If the forecast does not match actual production, adjust the azimuth (panel direction).
2. On the inverter page, click Plant info.
3. Fill in the fields according to your inverter data (use a dot as the decimal separator):
Latitude / Longitude – inverter location (required for production forecasting)
Inverter max power – device maximum operating power
Main breaker size – according to the electrical connection board
Battery Max Charge Current – in amps, when charging from the grid or solar
Battery max discharge current – in amps, when exporting to the grid
Battery Operation – choose State of Charge (%) or Voltage
Battery nominal voltage – in volts
Battery capacity – in kWh
Peak Shaving – limits peak consumption
Max export power – according to your grid operator agreement (e.g., nanogenerator 790 W; if no agreement → 0)
Refine forecast – enable if you want continuously improved solar forecast
4. Click Save.
! After saving, the device will reboot. The solar forecast may take up to 24 hours to appear. If the forecast does not match actual production, adjust the azimuth (panel direction).
2. Configuring solar panel groups #
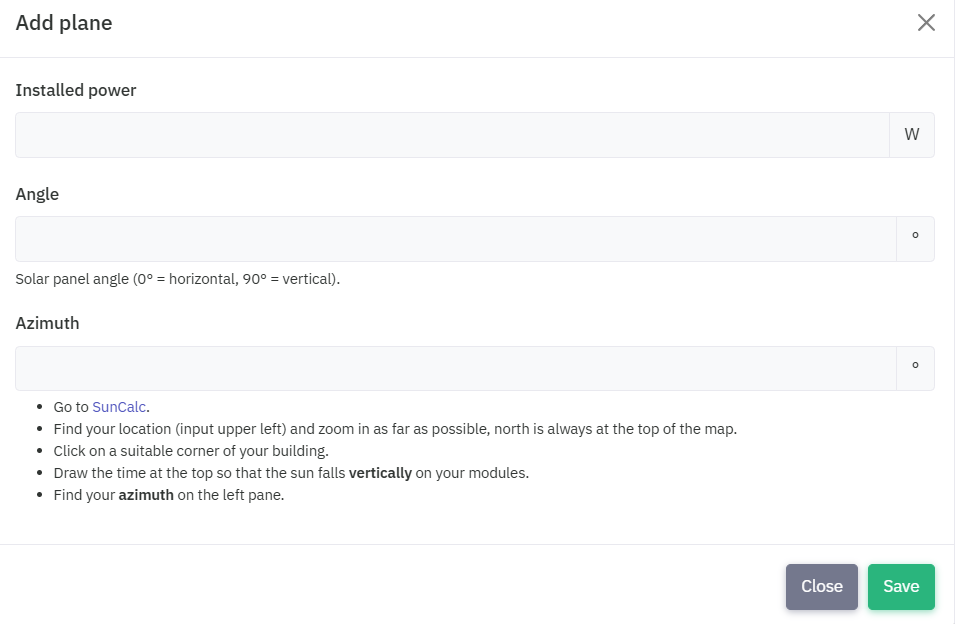
1. Open the Solar panel groups section.
2. Add each MPPT input or panel string/orientation as a separate group.
3. Fill in:
Total power – group total (kWp)
Tilt – panel tilt angle relative to ground (°)
Azimuth – direction in degrees (see section below)
2. Add each MPPT input or panel string/orientation as a separate group.
3. Fill in:
Total power – group total (kWp)
Tilt – panel tilt angle relative to ground (°)
Azimuth – direction in degrees (see section below)
3. Using Suncalc to find azimuth #
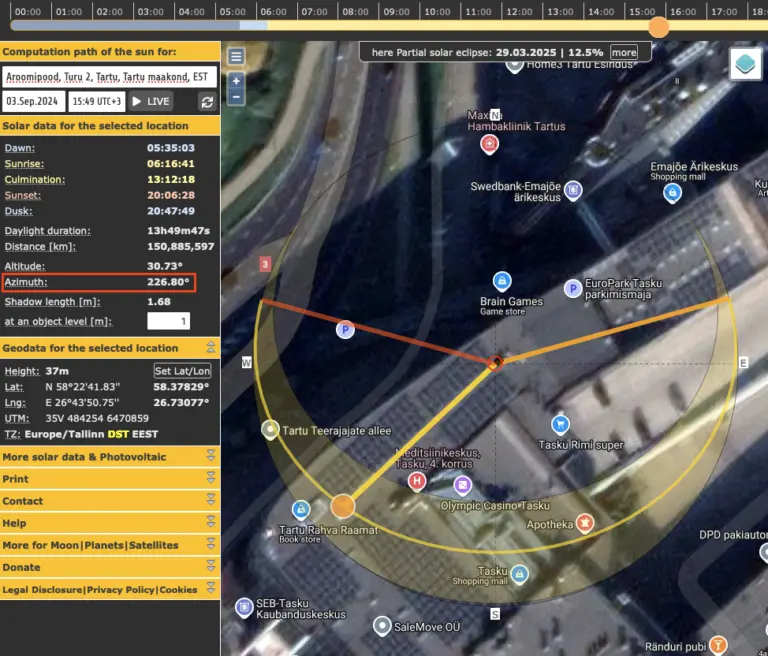
1. Open Suncalc.org.
2. Enter your solar plant address.
3. Drag the marker to your panel location on the map.
4. Adjust the sun timeline until the yellow line is aligned with your panels.
5. Check the Azimuth value (°) on the left and enter it into the panel group Azimuth field.
2. Enter your solar plant address.
3. Drag the marker to your panel location on the map.
4. Adjust the sun timeline until the yellow line is aligned with your panels.
5. Check the Azimuth value (°) on the left and enter it into the panel group Azimuth field.
Result #
Your solar inverter and solar panel group information is correctly configured. The Qilowatt system can now forecast production, manage batteries, and optimize energy usage and grid export.
If it Doesn’t Work #
• If inverter data does not appear, check that the device is connected and online.
• If the solar forecast does not appear within 24 hours, adjust the azimuth value.
• If the issue persists, contact our team: support@qilowatt.eu.
• If the solar forecast does not appear within 24 hours, adjust the azimuth value.
• If the issue persists, contact our team: support@qilowatt.eu.


